There are 2 type of testing:
Static Response: use atesting skuto test for purchase response (purchases, cancelled, etc.)Complete Flow: create atesting accountto go through almost real testing
Test Static Response
Instead of using using real SKUs, you can use the following sku for test for the corresponding response
android.test.purchasedandroid.test.canceledandroid.test.refundedandroid.test.item_unavailable
Below is an example to test Purchase.
fun launchBuy(context: Activity, skuDetails: SkuDetails) { var sku = skuDetails.sku if (BuildConfig.DEBUG) { sku = "android.test.purchased" // sku = "android.test.canceled" } val flowParams = BillingFlowParams.newBuilder() .setSku(sku) .setType(skuDetails.type) .build() val responseCode = billingClient.launchBillingFlow(context, flowParams)}NOTE: Based on the documentation, it seems like the testing device need to be the developer account.
Test Complete Flow
For complete flow testing, you need to publish your app to Google Play (you can publish as alpha or beta for testing purpose at Google Play Console - it won't appear to the public in Google Play as long as you didn't create a production release).
You need to create the SKUs as well.
To test your Google Play Billing implementation with actual in-app purchases, you will need to register at least one test account on the Google Play Developer Console. You cannot use your developer account to test the complete in-app purchase process because Google payments does not let you buy items from yourself.
Setting Up Test Accounts. Goto Google Play Console, click on Settings (on the left panel), enter your test account email at Licence Testing (Gmail or G Suite accounts are accepted).
NOTE: Developer Account can't be a Test Account.
NOTE: I didn't utilize Google Play App Signing
What if you testing device is registered with Developer Account as primary account? Goto Android Settings, look for something like Accounts, select Google. Usually your Developer Account is the first in the list. If you already have multiple account, remove the Developer Account and the next account can be used as Test Account. Else, add/register a new Google account to be designated as Test Account and remove Developer Account. You can add Developer Account back after completing the testing.
NOTE: I test the above method on Samsung S3 (Android ICS) and Xiaomi Mi4i (Android Marshmallow) and it works. Having said that, I didn't try it on my daily phone.
NOTE: I tried removing Developer Account from Google Play app (or switch to another account) on the device, this didn't work.
Once you setup the Test Account, testing is fairly easy. When you click to the buy button a.k.a launchBillingFlow, the following popup will appear.
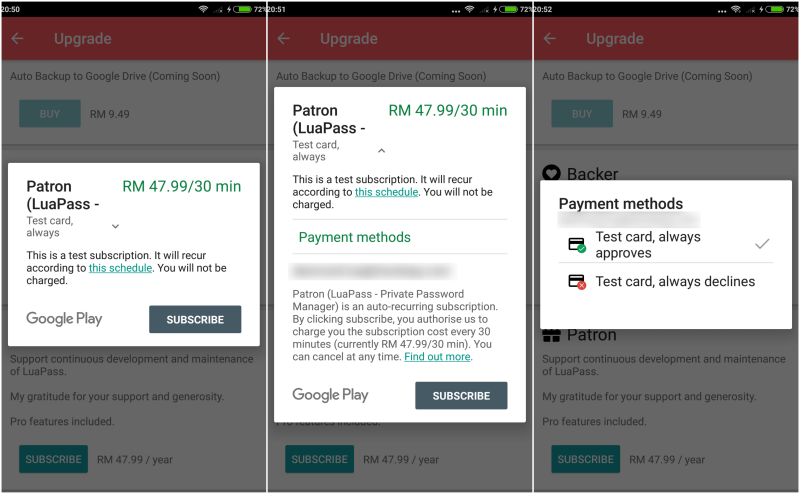
Observe there is a Test card, always text to indicate this is a test account (if you see no such thing, then this is not a test account). You can click on Test card, always then it will expand to the second screen. Click on Payment methods then you can test for approval or rejection.
Once you click Subscribe/Buy button and put in the appropriate password and confirmation, the purchase flow is complete. You will even received an email for this test purchase.
You can test for subscription renewal as well. I have a 1 year subscription where I believe it will auto expire after 30 minutes.
- 1 week = 5 minutes
- 1 month = 5 minutes
- 3 months = 10 minutes
- 6 months = 15 minutes
- 1 year = 30 minutes
NOTE: If you still get The publisher cannot purchase this item message, it means you didn't register the Testing Account at Google Play Console or the device primary account is not the Test Account.
References: